DIY: How to Paint a Highway Mural
How to paint a mural of a highway to decorate your children’s room without the need of complicated drawing techniques!
For all those who have children, nephews/nieces, little brothers or sisters, here is an easy mural that you can create to decorate their rooms without the need of complicated drawing techniques!
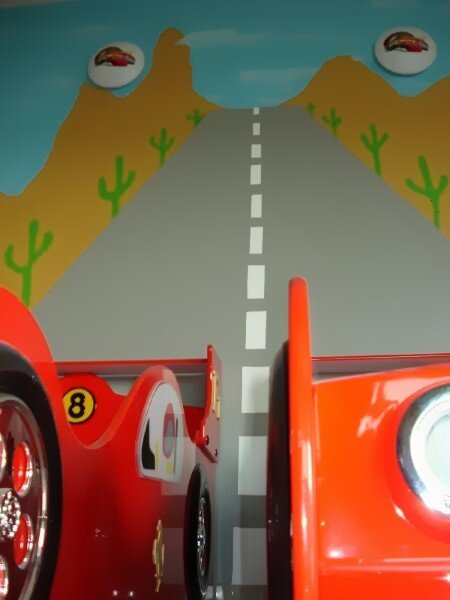
A while back I designed a room for some twin boys in Mexico. Alan and Jesus were very excited about the idea of having a themed room but had no idea what they wanted. Then, they went shopping for beds and found these awesome car beds that inspired the themed for their room.
Considering that the two boys shared a bedroom, I decided to paint a mural on the wall where the furniture would be incorporated into the design, and so the kids will feel like if they were part of the adventure.
This kind of highway design is actually very easy to draw and paint, check out the tutorial and some tips to re create it in your home below.
Materials to Paint a Highway Wall Mural:
Paint.
I used paint with a semi-gloss finish in the following colors:
Black (to paint the cactus spines)
White (to draw the lines of the road and the clouds)
Green (to draw cactuses)
Yellow Mustard (to paint the mountains)
Blue (to paint the sky)
Grey (to paint the road)
Tip:
Bring this idea to your hardware store with the measurements of the wall in your room and ask about how much paint to buy in each colors. For some of them you might just need a sample paint bottle for example, and for other things like the sky, mountains and highway, you will need much more.
You'll also need:
Pencil
Plastic to cover your floors and furniture
Masking tape 3 / 4 "
Brushes
Economic paint tray
Paint roller
A Thin brush for details
How to Paint a Highway Mural for a Kid’s Bedroom:
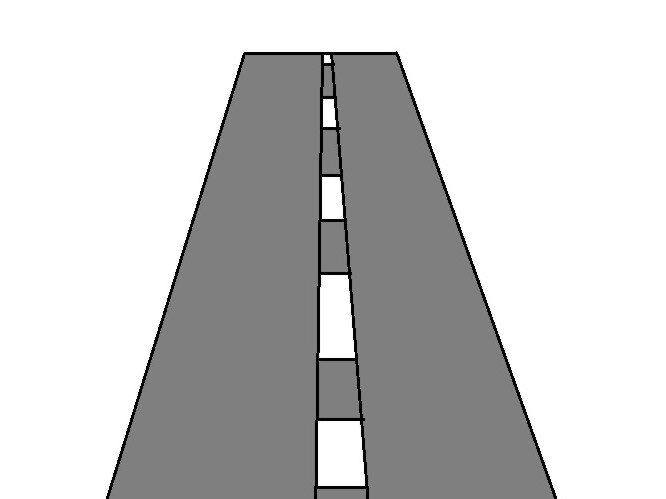
Trace the road.
Use a pencil to draw two lines in perspective. This should look like a triangle but without the end point. Add some lines in the middle as well, like you see in the picture below. Draw these lines in perspective as well, and close the rectangles in the middle so the highway actually looks like a two sides highway.
Draw the mountains
To create the mountains draw curves from the beginning of the wall until they connect with the highway.
Trace the Cactuses
Draw cactuses next to the highway in different sizes to match the perspective. The largest are supposed to be pretty close to us, and the smallest ones are the ones you see from far away
DIY: Children's Car Mural
4. Start painting !
After you finish tracing everything with a pencil, you can pretty much just paint inside the lines. Fill the road in gray, the sky in blue, mountains in mustard, cactus in green and dotted lines in white.

5. Paint the clouds using a sponge
You can make clouds with a sponge and white paint. Before painting the clouds you must remove excess paint from the sponge. The best thing is that the clouds are not solid and not perfect, so do not be afraid to try.
6. Add the spines in the cactuses
You can add some spines to the cactuses using a thin brush. To make the spines draw the letter "V" like in the picture below repeatedly filling the cactus.

DIY: Children's Car Mural
This is how the highway mural looks after the paint is dry! And now your room is ready for you to finish decorating and adding more special details.

This is how the highway mural looks after the paint is dry! and now is time to finish decorating your kid’s room with a Car’s theme