The Easiest Way to Decorate Chocolate Skulls for Day of the Dead
How to Easily Make and Decorate Chocolate Sugar Skulls: A Fun, Kid-Friendly Guide
With Halloween and Día de Muertos just around the corner, we’re getting into the spirit with a fun and easy DIY project! We recently stumbled upon a simple but awesome technique for making and decorating chocolate sugar skulls, and we can’t wait to share it with you.
The best part? It’s a candy-filled adventure that’s perfect for getting the kids involved. They’ll love joining in on the fun and helping out with this sweet project.
So, grab your materials and get ready for a deliciously creative time. Check out the steps we followed and all the juicy details below to get started on your festive chocolate sugar skulls!
This post may contain affiliate links.Thank you for supporting this website!
MATERIALS:
3D Sugar skulls mold. We got a plastic one that wasn’t super durable and we couldn’t find it again in any store. This one has better reviews and the shape is awesome.
Another one that we recently found is this one here, and it works great if you want to make flat chocolate sugar skulls. You will need less chocolate to make these sugar skull shapes and you can make more at the same time too.
500 grams of white chocolate
Candy, chocolate chips, colored edible sprinkles
Easy Guide to Decorating Delicious Chocolate Sugar Skulls:
1. Melt the White Chocolate
Start by melting about 90% of your white chocolate using a double boiler. Just be sure to keep an eye on the temperature, stirring occasionally to get a smooth, liquid consistency.
Once the chocolate is perfectly melted and smooth, turn off the stove and set the bowl aside.
2. Pour the Chocolate into Molds
Gently pour the melted white chocolate into your sugar skull molds. Take your time with this step to ensure the molds are filled evenly. A steady hand will help you avoid any air bubbles and get those skulls looking just right.
3. Chill the Chocolate Skulls
Place your filled molds in the refrigerator and let them chill for about one to two hours. This helps the chocolate set properly so you can pop them out of the molds without any fuss. You'll know they're ready when they feel firm to the touch.
4. Melt the Remaining Chocolate
While you wait, melt the rest of the white chocolate in your double boiler, just like before. Again, keep an eye on the temperature and stir until it’s smooth and liquid.
Once it's ready, pour it into a small container. This will be your "glue" for sticking on all the fun decorations.
5. Get Creative with Decorating
Now for the fun part—decorating your chocolate skulls! Use the melted white chocolate as a glue to attach various candies to your skulls.
We played around with different shapes for the eyes, nose, and mouth, using colorful candies and chocolate chips. You can also sprinkle on some edible confetti in fun shapes like stars or triangles to add an extra pop of color and make your skulls even more festive.
TIP:
Check out the video below to give you an idea of the materials we used. We got different types of candy to decorate the eyes, nose, and make the mouth.
The candy we used for the mouth might be difficult to get, but you could easily use something like small pieces of gum or mints to make the teeth.
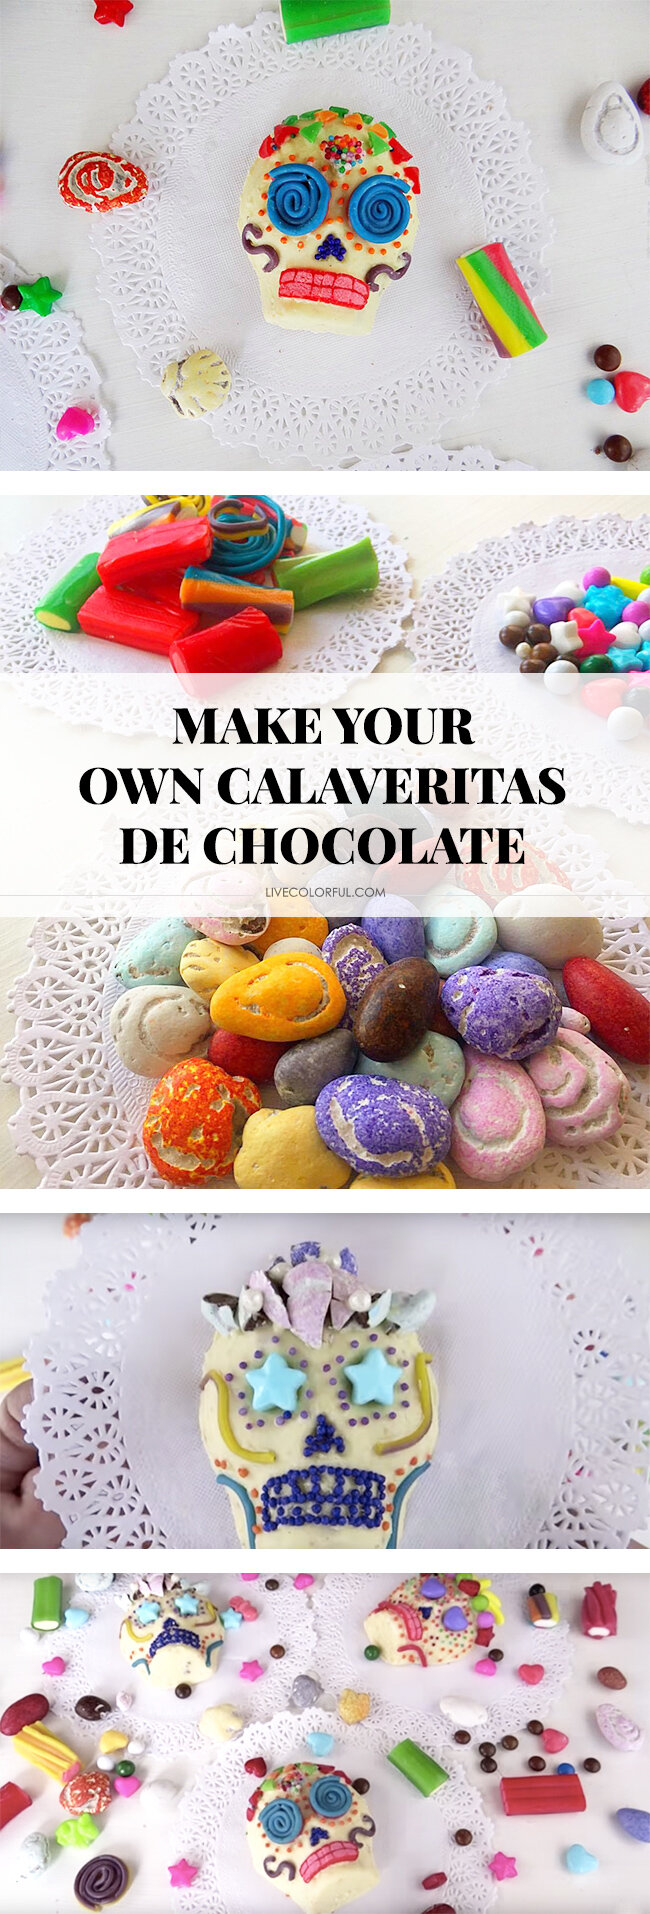
Check out the picture below for a glimpse into a fun project we did last year! This tutorial shows a different technique for making chocolate skulls, and we had a blast with it. We added a creative twist by decorating our skulls with white chocolate that we dyed with vibrant food coloring.
The process was surprisingly easy and so much fun! We mixed different colors into the melted white chocolate, then used it to add intricate designs and colorful patterns to our chocolate skulls. The end result was not only delicious but also super cute, just like the ones you'll see in the picture below.
If you're interested in giving this technique a try, check out the detailed tutorial linked below. It walks you through each step and shows you how to achieve those eye-catching designs. Happy decorating!
How to Make Chocolate Skulls for Day of the Dead

More Day of the Dead projects and ideas here: